Stainless steel isn’t supposed to rust. That’s practically its whole selling point. So when you spot orange streaks across your kitchen sink, brown spots on your barbecue grates, or rust patches on a stainless appliance, it feels like a betrayal. Here’s the truth: stainless steel can rust, and it happens more often than the name suggests. Removing rust from stainless steel is straightforward once you understand why it appeared and why most people accidentally make it worse before they make it better.
The wrong cleaning method on stainless doesn’t just fail to remove rust. It can scratch the surface finish, destroy the passive oxide layer that makes stainless steel rust-resistant in the first place, and leave you with a surface that rusts faster and more aggressively than before. That’s the trap. This guide helps you avoid it.
Why Stainless Steel Rusts in the First Place
Stainless steel resists corrosion because of chromium typically 10–30% of the alloy. When chromium reacts with oxygen, it forms a thin, invisible chromium oxide layer on the surface. This passive layer continuously repairs itself when damaged. That’s the protection mechanism.
But it has limits. A few things break it down:
- Chloride exposure – salt, seawater, and chlorine-based cleaners are the main culprits. Chloride ions attack the passive layer aggressively.
- Contact with carbon steel – leaving steel wool, cast iron, or carbon steel tools sitting on stainless transfers iron particles that rust and stain the surface. This is called contact corrosion or free iron contamination.
- Scratches that trap moisture – deep scratches hold water and debris, accelerating localised corrosion.
- Heat discolouration – high heat from grills or industrial processes can compromise the passive layer in specific zones.
Counterintuitively, most rust you see on stainless steel isn’t the steel itself corroding, it’s iron contamination sitting on the surface from external sources. That’s actually good news. It means it’s often easier to remove than it looks.
The Golden Rule: Always Work With the Grain
Before you touch anything, look at your stainless steel surface in good light. You’ll see fine parallel lines running in one direction, that’s the grain, created during the brushing or polishing process. Every cleaning motion you make must follow that grain. Not across it, not in circles. With it.
Scrubbing across the grain creates visible cross-hatched scratches that catch light at every angle. They won’t buff out easily. This is the single most common mistake people make on stainless, and it turns a rust problem into a permanent surface damage problem.
Not always easy to spot on polished mirror-finish stainless. On those surfaces, use the softest possible material, microfibre cloth, soft sponge and minimal pressure regardless of direction.
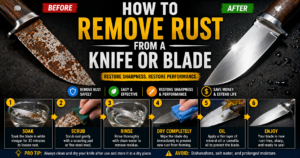
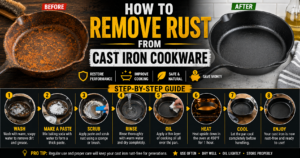
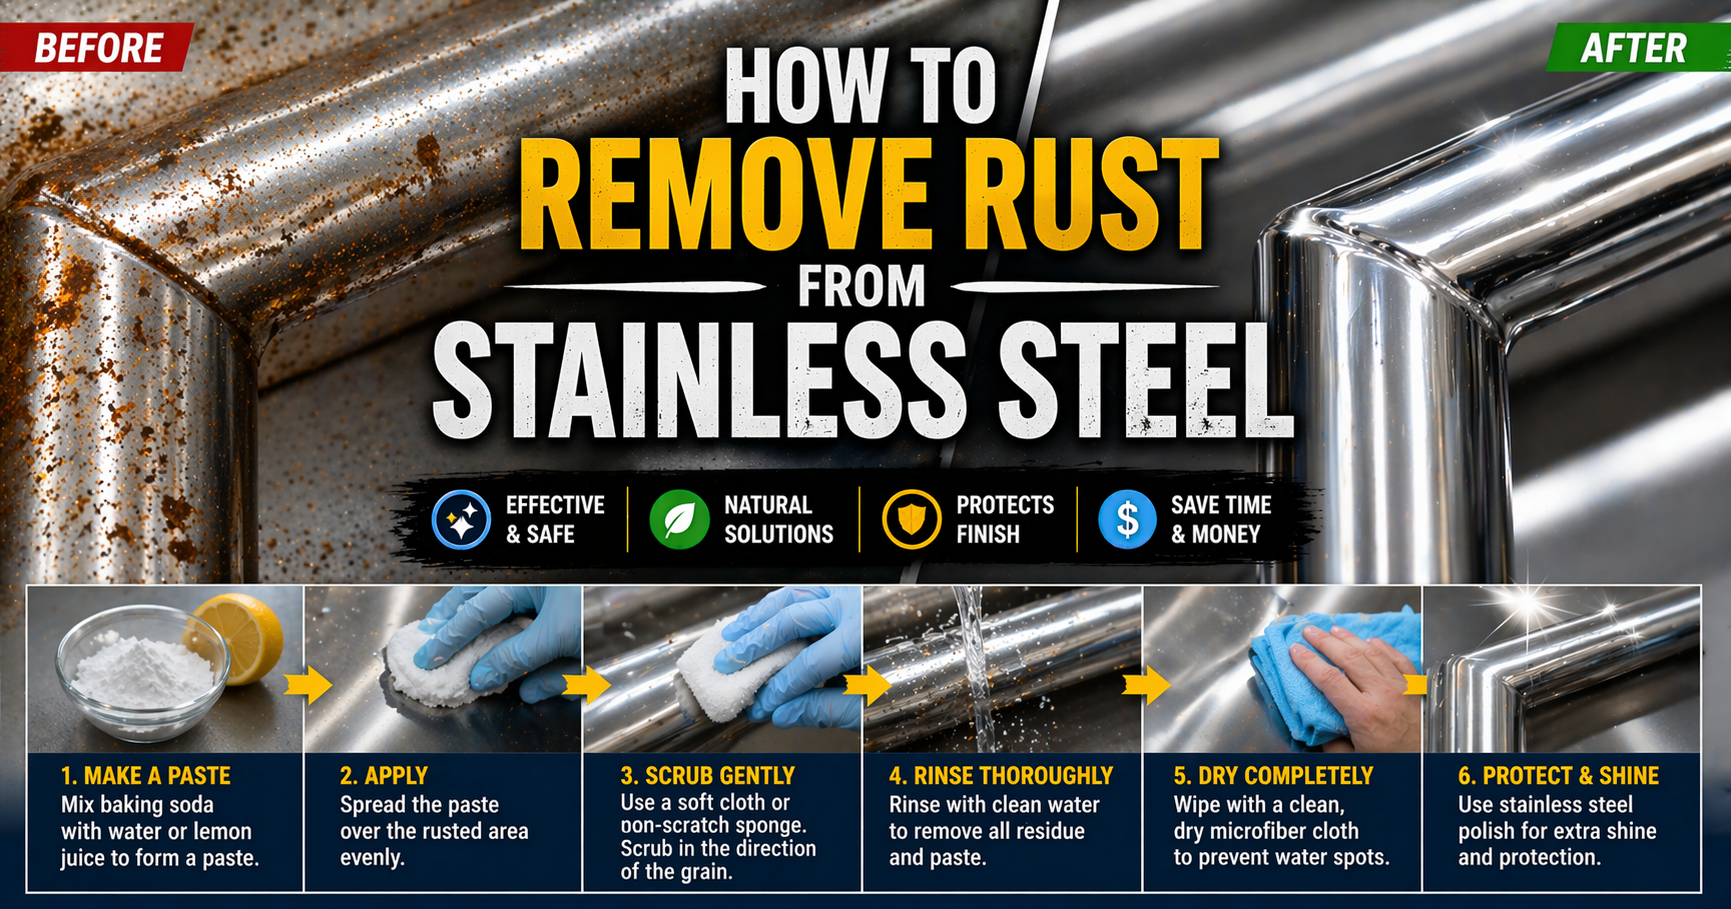
Method 1: Baking Soda Paste – Start Here
For most rust spots on stainless steel, baking soda paste is your safest starting point. It’s mildly alkaline, gently abrasive, and won’t damage the passive layer the way acidic cleaners can if left too long.
Mix baking soda with just enough water to form a thick paste. Apply it directly to the rust spots and leave it for 15–20 minutes. Then scrub gently with a soft cloth or nylon brush, working strictly with the grain. The mild abrasive action lifts the oxidation without scratching.
Rinse thoroughly with clean water and dry immediately moisture sitting on stainless, especially near the edges of fittings and joints, is how surface rust gets started again. This method handles light to moderate rust staining reliably and won’t leave any surface damage when done correctly.
Honest limitation: it won’t touch deep rust pitting or heavy contamination. For those, you need something more aggressive.
Method 2: Stainless Steel Cleaners and Oxalic Acid
Products like Bar Keepers Friend contain oxalic acid, an effective rust remover that works specifically well on stainless because it targets iron oxide without attacking the chromium oxide passive layer significantly. It’s the professional’s choice for kitchen sinks, appliances, and food-grade equipment.
Wet the surface, sprinkle or apply the product, and work it in with a damp cloth following the grain. Don’t leave oxalic acid-based products on stainless for extended periods — rinse after a few minutes. They’re designed for short contact time, not soaking.
| Method | Best For | Risk Level | Contact Time |
|---|---|---|---|
| Baking soda paste | Light rust spots, regular maintenance | Very low | 15–20 minutes |
| Bar Keepers Friend / oxalic acid | Moderate rust, sinks, appliances | Low | 2–5 minutes |
| White vinegar | Light staining, mineral deposits | Low-medium | 5–10 minutes max |
| Dedicated stainless cleaner | General rust and staining | Low | Per product label |
| Fine steel wool (#0000) | Stubborn spots, with polish | Medium | N/A – mechanical |
| Coarse abrasives/wire brush | Nothing on stainless | High – avoid | Never |
Free Rust Removal Guide
Get our complete step-by-step rust removal guide – covering every method, surface type, and product. Free to download.
Using Vinegar on Stainless Steel
White vinegar removes light rust and mineral staining on stainless, but it needs careful handling. Soak a cloth in undiluted white vinegar and lay it over the affected area for no more than 5–10 minutes. Don’t leave it longer – prolonged acid exposure starts to attack the passive chromium oxide layer, which is exactly what you’re trying to protect.
After the soak, scrub with the grain using a soft cloth, rinse thoroughly, and dry completely. Vinegar works well for rust staining around taps and fittings where mineral deposits and iron contamination often combine. For a deeper understanding of how vinegar interacts with different types of rust, our guide on removing rust with vinegar covers the chemistry in detail.
What about lemon juice?
Citric acid from lemon juice works similarly to vinegar and is safe for short contact times on stainless. It’s particularly good for light rust staining on kitchen equipment because it’s food-safe and leaves no harsh residue. Same rules apply – keep contact time short, rinse well, dry immediately.
Removing Contact Rust and Iron Contamination
If someone left a cast iron pan, steel wool pad, or carbon steel tool sitting on your stainless steel surface, you’ve likely got contact rust – iron particles transferred from the other item that have started oxidising on your stainless surface. It looks like your stainless is rusting, but the iron isn’t actually part of the stainless steel itself.
This is among the easier types to remove. Oxalic acid cleaners handle it well. So does a paste of baking soda and a light scrub. The key is not to let it sit – the longer iron contamination stays on stainless, the deeper it can work into any micro-scratches on the surface and the harder it becomes to remove cleanly.
Going forward: keep carbon steel, cast iron, and regular steel wool away from your stainless surfaces. Use nylon scrub pads instead of steel wool for routine cleaning. It’s a small habit change that prevents the problem entirely. The same principle of understanding what’s actually causing your rust applies across all metal types – our Ultimate Guide to Rust Removal explains corrosion mechanisms across the full range of metals.
When the Rust Is Pitting the Surface
Deep rust pitting on stainless steel is a different situation. The passive layer has broken down in that area, iron has corroded within the surface, and no amount of cleaning will restore the original finish. You can clean out the pitting with an oxalic acid product or fine abrasive, but the physical depression in the metal remains.
For cookware and appliances, this is mostly a cosmetic issue. For food preparation surfaces or medical/industrial equipment, pitting creates harbourage points for bacteria and contamination – at that stage, replacement or professional resurfacing is the correct call.
If you’re comparing this to rust behaviour on other metals – for instance, deciding whether your metal tools or kitchen knives need the same approach – it’s worth knowing that stainless steel generally resists deep pitting better than mild steel, but it’s more sensitive to the wrong cleaning chemistry.
Protecting Stainless Steel After Cleaning
Once you’ve removed the rust, give the passive layer time to re-establish itself – it rebuilds within a few hours when exposed to air. To accelerate protection and repel future staining, apply a thin coat of mineral oil, dedicated stainless steel polish, or a food-safe protective spray, buffing in the direction of the grain.
For outdoor stainless – barbecues, outdoor kitchens, marine fittings – a stainless-specific protective wax or coating makes a significant difference in how long the surface stays clean. Reapply seasonally. And avoid chlorine-based cleaners entirely on stainless; household bleach is one of the fastest ways to damage the passive layer and trigger exactly the corrosion you’re trying to prevent.
For a full rundown of long-term rust prevention across different metals and environments, our guide on how to prevent rust covers storage, coatings, and maintenance routines that keep metal in good shape year-round.
The Rust Restoration Handbook
The complete professional reference for rust removal and metal restoration. Every technique, product, and process – in one handbook.
Stainless Steel Rust Is Fixable – If You Use the Right Approach
Most rust on stainless steel is surface contamination, not deep corrosion – and that means it responds quickly to the right treatment. Start gentle with baking soda paste, step up to an oxalic acid cleaner for anything more stubborn, and always work with the grain. Rinse thoroughly, dry immediately, and put a protective layer on afterwards. The passive layer does the rest. Treat the surface right and it’ll stay clean far longer than people expect from a metal that supposedly wasn’t supposed to rust in the first place.